If you’ve been paying attention over the last few years, you’ll know that the folks at Alpine have been offering many different audio system upgrade solutions for Jeep Wrangler and Gladiator vehicles. These offerings range from head unit replacement solutions to complete audio systems with amplifiers and subwoofers. In this Product Spotlight, we will look at the i407-WRA-JL radio upgrade kit. Let’s check it out!
What is the Alpine i407-WRA-JL Kit?
The i407-WRA-JL is a radio upgrade kit for 2018 and newer JL chassis Jeep Wranglers and 2020 and newer JT chassis Jeep Gladiators. The kit includes an Alpine iLX-407 source unit along with mounting brackets, a radio trim kit, a new auxiliary input jack, all the wiring harnesses, a camera interface module, and an iDatalink Maestro RR integration module. The concept was to provide retailers with a package with everything needed to upgrade the entertainment system and prevent surprises in the installation bay.

Jeep Radio Upgrade Kit Features
The included dash kit and brackets take care of ensuring the radio is mounted in place of the stock source unit and looks great. The dash kit is molded to fit the complex shape of the dash for a clean, factory-like appearance.

In terms of integration, the factory-installed backup camera on these Wranglers and Gladiators uses a communication protocol called Low-Voltage Differential Signaling (LVDS). This signal isn’t directly compatible with aftermarket radios. As such, the i407-WRA-JL kit includes an interface module that converts the LVDS signal into a composite signal so the camera will work with the included iLX-407.
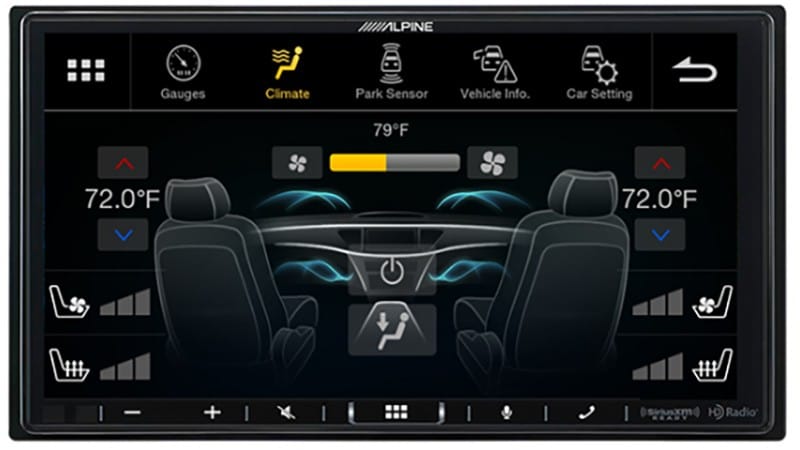
The kit also includes an iDatalink Maestro RR interface. This data interface and harness allows the new radio to plug into the wiring connectors from the original radio and provides access to the Jeep’s data network. Information like vehicle speed, engine RPM and much more can be displayed on the radio. The climate control settings are also adjustable from the face of the new radio.
One item worth noting is that if your Jeep is equipped with the factory amplifier, an optional interface module called the KCX-F200INT is available to let the new radio connect properly.
Alpine iLX-407 Features
The double-DIN iLX-407 is the radio at the heart of the i407-WRA-JL kit. This radio features a 7-inch anti-glare touch screen with a resolution of 800×480 pixels. The hard controls are along the bottom edge of the front panel. Apple CarPlay and Android Auto are included, as is Bluetooth for hands-free streaming or phone calls. The tuner in the unit offers support for HD Radio, which dramatically improves the quality of FM radio. There’s an HDMI input on the rear of the chassis, so you can theoretically connect a gaming system or a laptop, if you want. There are two camera inputs and support for the SiriusXM SXV300 tuner module.

If you want the best sound quality from your music, playing digital audio files from a USB drive is the way to go. The iLX-407 supports MP3, WMA, AAC, FLAC, and WAV audio formats with a maximum sampling rate of 48 kHz. The unit will also play AVI, MP4, MPG, MOV and WMV video files with H.264 or MPEG-4 video encoding. The maximum video file size is 4 gigabytes.
Audio Processing Features
The deck includes a four-channel amplifier rated at 16 watts per channel and in compliance with the ANSI/CTA-2006 standards for car audio amplifier power specifications. The triple preamp outputs are rated for up to four volts.
The iLX-407 is impressive in its audio processing features. It has a simple five-band graphic equalizer to let you fine-tune the system to your listening preferences. The more advanced crossovers offer adjustable slopes from six to 24 dB/Octave and filter frequencies from 20 to 200 Hz with high-pass filtering on the front and rear channels and a low-pass filter for the subwoofer output. There’s also a level control for each output, which many source units overlook. Oh, and the subwoofer level control can be adjusted from 0 to 15 with a polarity inversion option to potentially help the subwoofer’s output blend with the woofers in the dash and overhead sound bar.
The Time Correction setting screen allows your installer to dial in delays to each of the six outputs (which include the four built-in amplifier outputs) in 1 millisecond steps or set distances to the speakers in 3.4 centimeter steps. There are three presets available to store different Time Correction configurations. This is ideal if you want one alone in the vehicle or have a passenger, which requires different settings.

Jeep Radio Upgrade Kits
Alpine offers four Jeep-specific radio upgrade kits, including the i407-WRA-JL and a similar solution for older Wranglers called the i407-WRA-JK, covering 2007 through 2018 applications. If you want something fancier, the I509-WRA-JL and I509-WRA-JK kits include a 9-inch weather-resistant display, more advanced audio processing, and wireless smartphone connectivity.
If your Jeep is lacking in the audio department, visit a local authorized Alpine retailer and ask about the available Jeep-specific solutions. You can find an authorized retailer using the Store Locator tool on the Alpine website. For more information about the audio upgrade solutions available from Alpine, follow them on Facebook, Instagram and YouTube.
This article is written and produced by the team at www.BestCarAudio.com. Reproduction or use of any kind is prohibited without the express written permission of 1sixty8 media.