Clear Vibrations

Quakertown, PA's Mobile Enhancement Headquarters

550 California Road Suite 7
Quakertown, PA 18951
267-227-3875
  • Home
  • Services
    • Car Audio
    • Custom Installation
    • Driver Safety
    • Fleet Services
    • Remote Car Starters
  • About Us
    • Work for Clear Vibrations
  • Reviews
  • Location
  • Contact Us
  • Facebook
  • Instagram
  • Twitter
  • YouTube

Shining a Light on Headlight Beam Patterns: What You Need to Know

Beam Pattern

Every fall, car stereo and automotive accessory shops install thousands of lighting upgrades. These days, the most common upgrade is a set of LED headlight bulbs that fit into the stock light locations. While seemingly simple, the resulting beam pattern can be negatively affected if the chosen bulbs are not designed specifically for the lens or projector application. Let’s take a close look at understanding headlight beam patterns.

What Is a Headlight Beam Pattern?

Let’s kick this off with a bit of a definition. A beam pattern describes how the light from the headlight assembly illuminates the road. A lot of science goes into designing the reflector and lens in a headlight to focus the light energy where it does the most good. Of equal importance, headlights are designed to minimize blinding oncoming drivers. If an approaching driver can’t see correctly because your headlights aren’t aimed or functioning properly, everyone on the road is at risk. Crazy, bright headlights that blind everyone aren’t just dangerous for other drivers; they likely don’t work well at long distances. This reduces your safety.

Beam Pattern
Reputable aftermarket lighting companies like Baja Designs offer clearly defined beam patterns from their upgrades.

Off-Road Versus On-Road Lighting

In an off-road application, the driver wants as much light coverage as possible. If the trees are lit up, that isn’t a significant problem. However, on the road, we need to control where all the light from the vehicle goes. The issue with this light is that the beam is still directed at the oncoming driver’s eyes. This is incredibly dangerous as it prevents them from seeing any obstacles in front of them, including your vehicle, the road, or animals.

Beam Pattern
Side-view of a typical cone-shaped beam pattern from an off-road spotlight.
Beam Pattern
Overhead view of a typical cone-shaped beam pattern from an off-road spotlight.

The solution might be to angle the lights down so the top of the beam is below horizontal. The problem with this method is that the hot spot in the middle of the light is no longer way out in front of the vehicle. Most of the light will illuminate an area about 50 feet away. We don’t need to see this part of the road as much as we need to see 100 feet and beyond. Further, with the foreground so bright, the iris in our eyes will close to reduce the total light we see. This reduces how much we can see objects in the shadows or long distances.

Beam Pattern
Aiming the lighting down so the top of the beam is below horizontal will help reduce glare.
Beam Pattern
Lighting aimed too low will illuminate the foreground too much, reducing visibility at long distances.

Proper Automotive Headlight Systems

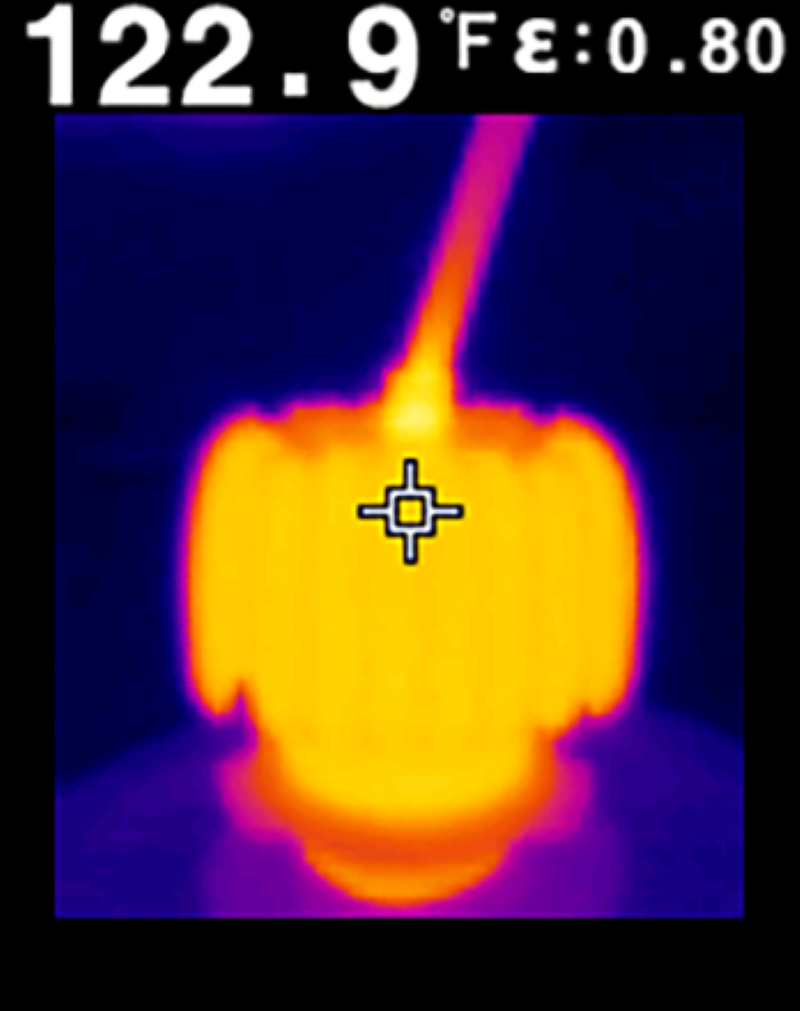
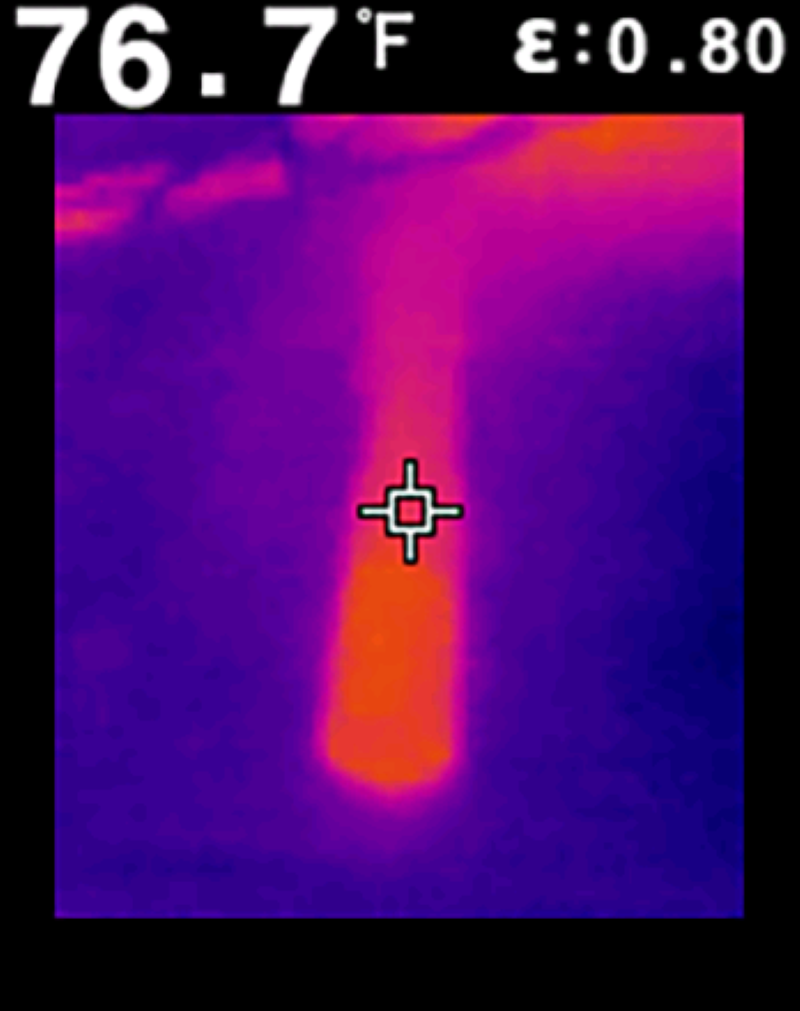
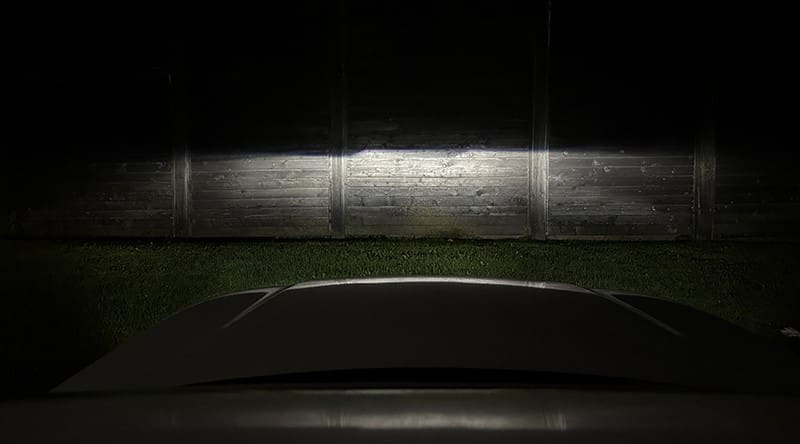
Many new cars and trucks use LED projector headlights; although some models may use reflector-type headlights, HID lights, or halogen bulbs. In the case of projector light assemblies, a cut-off feature assists in creating a good beam pattern. The goal of the lighting system is to illuminate the road as far as possible without making the foreground too bright. This requires a well-focused hot spot in the middle of the light and a way to prevent oncoming drivers from being blinded.

Beam Pattern
A metal shutter is placed in the headlight assembly to prevent oncoming drivers from being blinded.

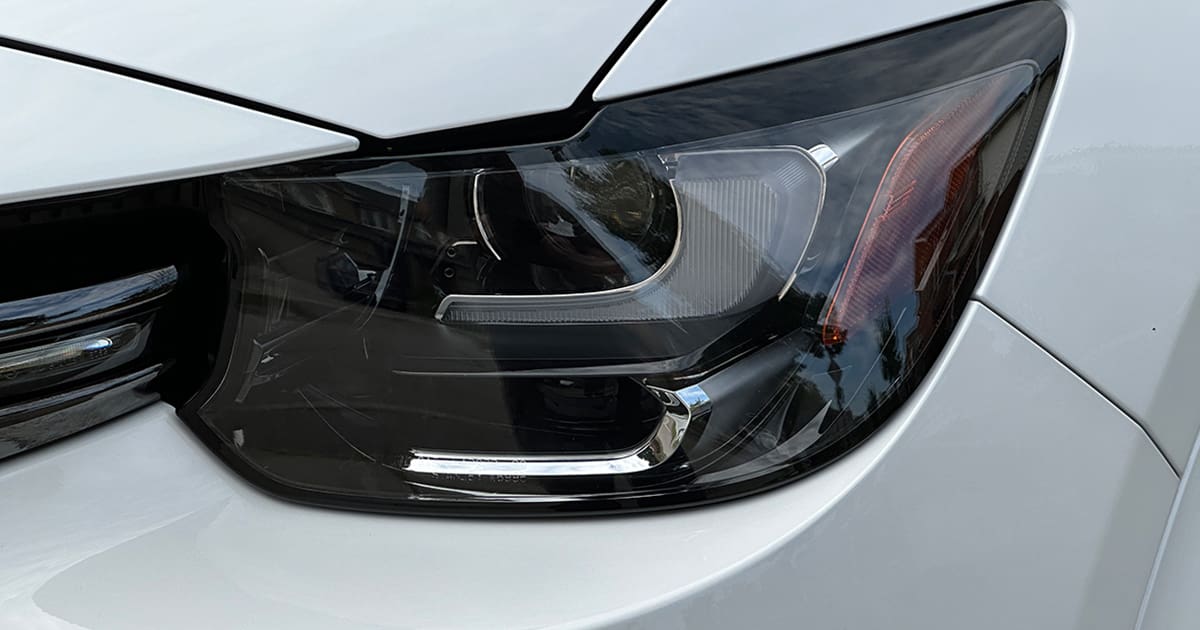
Looking at the image closely, you’ll see a metal plate in the middle of the light assembly. The plate has a notch in it. That plate is oriented so it bisects the hot spot of the light beam. If the vehicle is pointed at a wall, you will see the step down on the left side of the light and a hot spot in the middle of that step.

Beam Pattern
A photo of the headlight beam pattern from a new SUV with LED projector headlights.

Asymmetric Low Beam Pattern

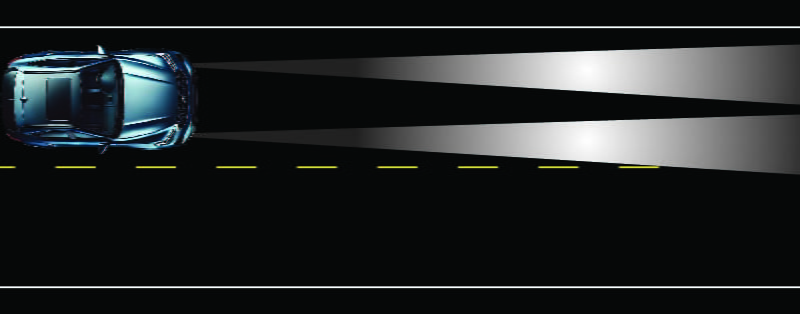
The step in the shutter reduces the light that shines on the left side of the road. This allows the lane in front of you to be well-illuminated while reducing glare for oncoming drivers. This is called an Asymmetric Low Beam Pattern. Here’s an aerial image of the beam pattern from the SUV to show the effect on the ground.

Beam Pattern
An aerial photo of the beam pattern produced by the headlights illuminating the fence in the above image.

If you look closely at the pattern produced by the headlights, you can see a beam of light extending almost off the image’s right side. This light is in line with the vehicle’s direction of travel and will light the road far off into the distance.

Beam Pattern
This second photo of the beam pattern further accentuates how light is focused towards the right side of the road.

What to Know When Upgrading Headlights

If you plan on upgrading the lighting on your car, truck, or SUV, it’s paramount that the changes you make don’t negatively affect the beam pattern. First, the hot spot should remain in the center and not dramatically brighten the foreground. The cutoff must remain sharp so as not to blind oncoming drivers. Technically, any bulbs you install should comply with FMVSS and be marked accordingly to be legal for on-road use.

Something is wrong if the lights don’t seem as bright or there are streaks of light pointing off to the side or upward. Have the shop reinstall the original bulbs until you find a perfect solution.

This article is written and produced by the team at www.BestCarAudio.com. Reproduction or use of any kind is prohibited without the express written permission of 1sixty8 media.

Filed Under: ARTICLES, Lighting, RESOURCE LIBRARY

The Difference Between Lumens, Lux and Candela

Light Lumens

When it comes to upgrading your vehicle’s lighting, a clear understanding of lumens, lux and candela is not just beneficial, it’s crucial. Just like some less scrupulous car audio amplifier, speaker and subwoofer manufacturers, automotive lighting manufacturers often manipulate specifications. This is evident when you browse through platforms like Amazon, AliExpress or Temu, where you’ll find automotive headlight bulbs and flashlights with exaggerated output specifications. At BestCarAudio.com, we take specifications and measurements seriously. So let’s dive into the difference between lumens and lux, and debunk a few examples of overrated products, empowering you to make informed decisions when upgrading your vehicle’s lighting.

Definition: Lumens

Let’s shed some light on lumens. A lumen is not just a unit of measurement; it’s the key to understanding the brightness of visible light emitted from a light source. In simpler terms, it’s the measure of how bright a light source is. This knowledge is particularly valuable when you’re considering a lighting upgrade for your vehicle.

This will get a bit complicated, but the information is necessary. A steradian, also known as a square radian, is a unit that describes the area of a sphere. A sphere is divided into 4pi or 12.56636 steradians. A single steradian is defined by the area on the sphere’s surface that represents the square of the sphere’s radius. For example, if the sphere has a diameter of 6 feet and subsequently a radius of 3 feet, then 1 steradian would have an area of 9 square feet. The area would be 25 square feet if the radius were 5 feet.

Light Lumens
A graphical representation of a steradian. Image Credit: Andy Anderson, Amherst College, Amherst, Massachusetts

Now, why does a steradian matter to the definition of a lumen? It’s because 1 lumen is defined as the amount of light produced by a light source of 1 candela over an area of 1 steradian (sr). As a gross generalization, 1 candela is the amount of light produced by a (very specifically defined) candle. Annoyingly, the definition of a candela describes a light source that produces 1 lumen of luminance over an area of 1 steradian. This might seem like circular logic, but understanding these terms can help you make informed decisions when buying automotive lighting products.

Imagine we have a portion of a sphere, which would be like an umbrella. The area of the underside of the umbrella is the square of the length of the handle (assuming the entire surface of the umbrella is equidistant from the base of the handle). If we illuminate it with a light source of 1 candela (located at the base of the umbrella), then we would see 1 lux of illumination on the underside of the umbrella.

Definition: Lux and Candela

Now, a lux (lx) defines luminance and describes the perceived intensity of light. One lux is the brightness level of 1 lumen over 1 square meter. We use the term lux to describe brightness levels. For example, if you are trying to photograph or shoot a video of something, you will need to ensure that there’s enough light to get proper exposure. Handheld light meters are used at photoshoots and movie sets to ensure consistent lighting.

Now, our light meter measures illuminance using the unit candela. This is directly related to lux in that 1 candela is 1 lumen over an area of 1 steradian, just as we mentioned in the umbrella example.

We must consider the area of adequate illumination in any light measurement. Why? Think of what happened during the solar eclipse in April. The sun’s light output didn’t change, but because the moon blocked the light, we experienced darkness. The sun is said to produce 36 octillion lumens of output, or 3.6 x 1028. That’s pretty bright. However, it sure got dark here on April 8. We went from 3,000-5,000 lux (as it was partly cloudy) to probably about 5 lux. In retrospect, we should have measured it and logged the data.

In the context of light sources, we use the term lumen to describe the amount of light produced at the source, and lux or candela to describe the intensity of the light at a specific point. Nobody should care how bright the lightbulb is if it can’t light up what we want to see.

Light Source Measurements – Automotive LED Bulb

Let’s look at two light source examples that will help illustrate why understanding lighting specifications is essential. We’ll start with a low-cost LED replacement headlight bulb. We found a bulb from a company called Hocolo on Amazon. The listing claims that the bulb consumes 25 watts of power, produces 4,000 lumens of light and has a color temperature of 6,500K. You have to read the fine print to see that the large 8,000-lumen claim in the listing title is for a pair of bulbs and that the published 50-watt rating is also per set. Silly. That’s like car audio companies that provide a wattage rating for a pair of speakers.

We have several solutions for measuring the power a device consumes, but we’ll keep things simple and pass the current from our bench power supply through the 10-amp input of one of the Fluke meters in our lab. We’ll use a second meter to measure the voltage at the bulb. We measured 13.94 watts into a single bulb after the required 30-second warm-up period. Unlike incandescent bulbs that use wattage ratings to describe their light output, the power rating number is quite useless with LED bulbs, other than to identify that they consume less current than their archaic brethren.

Next, we will measure the total light output of the HID bulb using our new TKLamp Flashlight Tester integration sphere. An integration sphere is a specialized light-measuring device that can quantify the total output of a light source. It features, unsurprisingly, a sphere, which, in the case of the TKLamp, is about 6.25 inches in diameter. The sphere’s interior surface has a special white coating that disperses light evenly in all directions. Finally, a high-accuracy light sensor tells us exactly how many lumens the light produced.

Light Lumens
Our TKLamp Flashlight Tester includes an integration sphere and a light sensor for 1-meter candela measurements.
Light Lumens
A dedicated light sensor on a long lead wire makes measuring light output (in candela) at 1 meter a simple process.

The Hocolo bulb measured 1,424 lumens initially and 1,257 lumens at the 30-second mark. As we’ve tested many bulbs, it’s not uncommon to see those designed to be as bright as possible dramatically reduce their output as they heat up. Pushing an LED harder, which means pushing more current through it, does make it brighter, but it also dramatically reduces its expected lifespan. The Hocolo was down to 1,163 lumens at the two-minute mark and continued to decrease.

Light Lumens
The output of the Hocolo bulb continued to decrease over the first 100 seconds of use.

Finally, we want to measure how much light this bulb can produce at a distance of 1 meter (3.28 feet) away from the source. The TKLamp system includes a secondary measurement sensor to capture candela. Once again, we let the bulb run for 30 seconds before we took a measurement. In fact, we took two measurements. The first had one side of the bulb where the LEDs were mounted and pointed directly at the light sensor. The second measurement has the LED sets pointing left to right rather than one down at the sensor. This perfectly demonstrates the importance of measuring how much light a bulb can shine on the surface you want to illuminate. This is in contrast to stating how much light the source produces overall. We measured 204 candela with one bank of LEDs pointing at the sensor and 40 candela with the sensor in the dark spot between the LEDs.

Light Lumens
With one set of the LEDs pointing directly at the light sensor at a distance of 1 meter, we measured 204 candela of output.
Light Lumens
With the LEDs pointing perpendicular to the light sensor, only 40 candela registered on the TKLamp display.

Light Source Measurement – LED Flashlight

Next, we have an inexpensive flashlight from Pocketman. The sdt356 flashlight uses two AAA batteries and has a rating of 500 lumens. Once again, we used the TKLamp Flashlight Tester to measure the total light output from the flashlight and how much illumination it provides at 1 meter.

After 30 seconds, the TKLamp tester told us the light was producing 55 lumens. In terms of illumination, we measure 1,144 candela at 1 meter from the sensor. The brightness didn’t change significantly over time.

Light Lumens
Unlike the LED light bulb, the output of the little flashlight was quite consistent.

Compare the two numbers from the different light sources. The LED bulb produced 1,100-1,200 lumens, but without a reflector and projector housing, it could only provide 204 candela of illumination at a distance of 1 meter. On the other hand, the little flashlight only produced 55 lumens of output, but thanks to the reflector around the LED, it provided 1,144 candela of illumination on the light sensor. All the light was focused on a relatively small spot. If the beam angle had been adjustable, it would have provided even more candela.

Feel the Heat

As a short aside, we noticed the LED bulb quickly became quite hot. So we broke out the thermal imaging camera to see what was happening. After three or four minutes of operation, the heatsink on the back of the LED had reached almost 123 degrees. That’s pretty toasty. While LEDs are MUCH more efficient than incandescent bulbs, they still produce a lot of heat.

Light Lumens
A thermal image of the heatsink on the back of the LED bulb.

While we had the thermal camera out, we measured how warm the flashlight got. After three or so minutes of operation, the body had reached just under 77 degrees. Not only was this much more comfortable to handle, but the little LED chip in the flashlight would likely last much longer.

Light Lumens
A thermal image of the body of the LED flashlight.

Automotive Headlight Upgrades

When it comes to upgrading the lights on your car or truck, please don’t fall prey to thinking that a bulb with a high lumen rating is guaranteed to be brighter or that it will actually produce the light output it claims. The compatibility of the bulb you’ve chosen with the headlight lens assembly on your vehicle plays a massive role in determining how much light will be seen in front of the vehicle. Using a bulb not designed for a specific housing type could result in abysmal performance. If light is produced in directions that might blind oncoming drivers, a theoretically simple upgrade could be extremely dangerous.

If you want to see better while driving in the dark, visit a local specialty mobile enhancement retailer and talk with them about the bulbs they have available and their experience with vehicles similar to yours.

This article is written and produced by the team at www.BestCarAudio.com. Reproduction or use of any kind is prohibited without the express written permission of 1sixty8 media.

Filed Under: ARTICLES, Lighting, RESOURCE LIBRARY

Headlight Bulb Upgrades: Part 5: Electrical Interference

Electrical Interference

As we continue our series on headlight bulb upgrades, it’s time to discuss electrical interference. Just as in the previous article on spectral content, this is an issue that very few retailers or manufacturers check for or discuss. While these considerations don’t affect the performance of your lighting system, they can significantly affect the performance of your vehicle’s audio system. They could also potentially affect tire pressure monitoring or keyless entry systems. Let’s dive in!

What Is Electrical Interference?

Let’s talk about what causes electrical interference. At the most fundamental level, any time current flows through a conductor, an electrical field is created around that conductor. We typically discuss direct current (DC) when talking about the battery and alternator in vehicle electrical systems. The fixed electrical field around conductors isn’t a huge issue for DC flow unless the alternator has a regulator problem and is adding alternating current (AC) ripples. Even then, it’s the AC that could pose a problem.

We can get into noise trouble with DC when it powers a device with a switching power supply. Large car audio amplifiers, HID light ballasts and LED light bars are devices with switching power supplies that can cause interference issues. Some LED bulbs also have switching power supplies.

Electrical Interference
Inexpensive, poorly designed lights with switching power supplies can cause electrical interference.

Inside a switching power supply, the DC power from the vehicle’s electrical systems is pulsed on and off very quickly. These pulses enter a transformer that steps the voltage up or down. Amplifiers typically use step-up transformers to produce higher voltages to deliver more power to speakers. Items like LED lighting systems use step-down transformers or buck regulators to decrease voltage.

When the current from the battery pulses on and off, that can create a significant source of electrical interference. If you’ve ever adjusted the dimmer in a home and heard the light bulb ring, that’s the presence of unwanted harmonics caused by switching the AC supply on and off midway through the waveform.

You will find that high-quality amplifiers, in particular, have filtering networks on the power feed into the amp. These networks help smooth any noise that might come from the alternator. Still, they primarily prevent switching noise from inside the amplifier from being fed back onto the power wire to radiate through the vehicle.

Electrical Interference
Amplifiers like this ARC Audio X2 650.1 include capacitors and inductors on the power inputs to prevent radio interference.

What Problems Does Electrical Interference Cause?

In lighting systems, the most common problem in poorly designed lights is the effect on AM and FM radio reception. The noise produced typically occurs in the same range of frequencies as AM (780 to 1610 kHz) and FM (88 to 108 MHz). This unwanted interference can drown out weak radio station signals or add noise to some stations.

Other wireless communication systems like keyless entry and tire pressure monitoring can be affected by sources of electrical noise. Most keyless entry systems operate on 315 and 433 MHz frequencies. Tire pressure monitoring systems use these same frequencies.

If you think a recent lighting or accessory upgrade is affecting radio reception, there’s an easy way to test to see if your hypothesis is correct. Turn on the radio and tune to whatever station you think is affected. Then, turn off the device you think is causing the interference. If it’s a lighting product, turn off the lights. Pull the fuse out of the amp if you think there’s something else, like a subwoofer amplifier, that might be causing problems. This testing process gets tricky if all the sound from your audio system is produced by the amp you think is causing the problem. In that case, seek professional assistance.

Dealing with Electrically Noisy Lighting Upgrades

If you’re in a situation where you have a noisy lighting upgrade, return it and have the shop install a higher-quality product.

If you’re determined to have the shop fight with what you’ve purchased, two solutions typically work to reduce noise feeding back into the vehicle’s electrical system. The first and most straightforward solution is to add an inline filter. These filters include capacitors and inductors that help smooth out the noise from the switching power supply in the lights.

If the installer reads the instructions for most HID and LED upgrades, they’ll note that most reputable companies recommend installing new light wiring. Companies like Lumens HPL offer harnesses with the correct connectors or plugs to integrate directly with the factory wiring. These harnesses include relays, fuse holders and everything needed to power the new lights directly from the battery.

Electrical Interference
Two examples of HDRL aftermarket lighting power harnesses from Lumens HPL.

There are two benefits to using a dedicated power harness. First and foremost, power for whatever lights you’ve chosen comes directly from the battery and alternator. These power sources bypass any daytime running light or sensing circuitry, so you know the system will get all the voltage possible from the vehicle. Second, if the bulbs you’ve chosen are from a no-name brand that does cause electrical interference on the wiring, the battery acts like a giant filter. The wiring that might have noise on it remains up in the front of the vehicle. If your installer used the factory wiring, that noise might feed back to a body control module in the vehicle interior.

Electrical Interference
An example of an installation wiring diagram for aftermarket lights.

Measuring Electrical Interference

We have a device in the BestCarAudio.com lab called an RTL-SDR. In short, it’s a USB-stick radio receiver. We can tune into radio frequencies and decode AM or FM audio signals using dedicated software. We can also monitor ham or GRMS radio. This device is a receiver-only solution – we can’t broadcast.

We set the antenna up about a meter from an old HID ballast and took some measurements. We don’t have any low-quality light upgrades around the shop, but at least we could see “something” from our testing.

The image below is a spectrographic capture of 10 seconds of RF energy between 90.4 and 92.9 MHz. These frequencies would be down near the bottom of the FM radio band. Brighter colors in the spectrograph show more power. The red and yellow information on the left is the audio from 91.1 FM. The light blue in the middle is 91.7, and the yellow is 92.1. You can see the clearly defined bands on either side of the 92.1 MHz audio information. Those digital side-bands can carry information like HD Radio or RDS-TMC traffic information.

Electrical Interference
A spectrographic sample of radio frequency information between 90.4 and 92.9 MHz.

We moved the antenna to an area of the lab where radio reception is much worse to establish a baseline for our test. That image is below.

Electrical Interference
Our reference RF measurement with no strong radio stations.

Next, we turned on that HID light and repeated the measurement.

Electrical Interference
Measurement of the RF output of a HID headlight ballast and bulb.

Though it’s not terrible, several dozen bands of sweeping energy have now polluted the measurement. These signals wouldn’t likely be strong enough to prevent you from picking up a radio station. Still, it would reduce audio signal clarity when reception is affected by buildings or environmental conditions.

Buy Quality Products and Avoid Headaches

When the price of a product seems too good to be true, it often is. Sometimes, it’s not the specific performance of a light or amplifier; they might do what they claim. However, other factors like electrical interference or heat may cause problems. If you stick with brand-name solutions, you’re unlikely to run into problems. Drop by a local specialty mobile enhancement retailer to learn about the high-quality lighting upgrades available to help you see safely when the sun sets.

Lead-In Image: Credit to @zirconicusso for the radio image used in the Lead-In.

This article is written and produced by the team at www.BestCarAudio.com. Reproduction or use of any kind is prohibited without the express written permission of 1sixty8 media.

Filed Under: RESOURCE LIBRARY, ARTICLES, Lighting

Headlight Bulb Upgrades: Part 4 – Headlight Bulb Type and Object Illumination

Headlight Bulb Type

We’ve watched hundreds of videos on YouTube and read dozens of articles on headlight upgrades, yet we’ve never seen anybody discuss how different bulb types light up different colored objects. We aren’t discussing the headlight bulbs’ brightness or the beam pattern. Halogen, HID and LED bulbs output different wavelengths of energy. We see objects when that energy reflects off them and bounces back to our eyes. It stands to reason that the perfect light source would illuminate all colors identically. However, that isn’t the case. Let’s dive in.

Light Source Spectral Analysis

Let’s start with an analogy. Most of our readers are familiar with the audible frequency range of human hearing, which is 20 Hz to 20 kHz. There are plenty of frequencies above 20 kHz that animals like dogs, cats, dolphins, bats and whales can detect. A porpoise can hear from 75 Hz to 150 kHz. That’s a half-octave higher than bats.

Our vision works in the same way. Our eyes can detect light within a specific range of frequencies, between 400 and 790 terahertz. Different frequencies represent different colors. As we age, our ability to detect differences in violet, blue and green objects diminishes.

Headlight Bulb Type

The chart above shows the colors the human eye can perceive, including frequency ranges and wavelengths. When we discuss color, we use wavelength rather than frequency. Energy with a higher frequency than violet light is called ultraviolet. Energy with a lower frequency than red light is called infrared. Some animals can see energy in these extended frequency ranges to help them find food or mates.

How Sunlight Affects Color Distribution

We can measure the amount of each frequency a light produces using a color spectrometer. The information the spectrometer provides is like a real-time analyzer for audio signals. It tells you what frequencies (or wavelengths) are present and the amplitude of each of those frequencies.

Headlight Bulb Type
An example of a frequency response measurement taken using SMAART software.

The graph above shows that there isn’t much information below 125 Hz, which is logical since the sample came from a laptop speaker. Because this is a sample of music and not a test tone, there isn’t much else we can extract from the data other than the information extending to 20 kHz.

Now, let’s establish a standard for light spectral measurement. The graph below shows the spectral content of a measurement of the sun taken on a clear day.

Headlight Bulb Type
Spectral analysis of light from the sun on a clear day.

We can see that the light distribution is relatively even across the visible spectrum. Environmental factors like moisture, oxygen, dust and pollution cause dips and low-wavelength attenuation.

How we perceive objects depends on the light source that illuminates those objects. All colors are easily visible when we are outside on a sunny day. When we move indoors and use different light sources, the energy balance shifts dramatically. Let’s look at three popular headlight types and analyze how they produce light.

Up first, let’s look at a halogen headlight bulb. This is a basic Phillips bulb with a single filament. It doesn’t have any blue coatings. We measured the light level at a distance of 2 meters from a projector-style headlight assembly.

Headlight Bulb Type
Spectral analysis of a halogen headlight bulb.

It’s easy to see that most of the light energy produced by the halogen bulb is in the high wavelength/lower frequency range. This energy distribution makes sense, given the amount of heat the bulb produces. This halogen bulb produces very little green or violet light.

Now, let’s check out the light produced by a high-intensity discharge (HID) light bulb. This particular system is from a company called Lumens. I’ve used them in almost all my vehicles for decades.

Headlight Bulb Type
Spectral analysis of a HID headlight bulb.

The HID bulb produces light that contains peaks at several lower wavelengths. Those peaks would correlate to the different chemicals present in the ARC chamber. Using gas chromatography, scientists can analyze the light from burning gases to identify the elements that are present. The takeaway from the HID analysis is that very little orange or red light is produced.

Let’s look at an aftermarket light-emitting diode (LED) bulb. This is one of the Sportline bulbs from Lumens.

Headlight Bulb Type
Spectral analysis of an LED headlight bulb.

The LED bulb produces primarily blue light with a bit of light green, yellow and light orange. Very little violet, dark blue or red light is produced.

Let’s combine all three measurements to see how they compare in terms of the colors of light energy they produce.

Headlight Bulb Type
A composite of the three light sources in a single graph.

The HID and halogen are similar if you measure the total light produced by these bulbs. The LED isn’t quite as bright in this application. However, we want to look at the frequencies produced by each light source. These correlate to the color of objects that will be illuminated well. If a bulb doesn’t produce a significant amount of red light, red objects won’t show up well.

How Light Sources Affect Object Perception

We set up some Hot Wheels cars on a white background to quantify how these light sources illuminate different colored objects. We took pictures of the vehicles with the three light sources without changing the camera settings. The camera is a Canon 70D with a 50mm F/1.8 lens. The settings for the images are 1/10 of a second exposure with an f/8 aperture and the camera set to ISO 100. Aside from cropping and resizing, we didn’t adjust the images in any way.

Headlight Bulb Type
Our little collection of Hot Wheels cars illuminated by the room lights in the shop.

The room lights cast reasonably even light over the cars. The dark violet Batmobile to the left of the two-tone blue SUV is a little dark, as these are LED lights. The vehicles are not in the direct hot spot of the light source since we didn’t want too much reflection.

Let’s start with the halogen headlight first.

Headlight Bulb Type
Our selection of Hot Wheels illuminated by a halogen headlight.

The violet Batmobile and blue SUV look almost black in this image. The red car on the right and the fluorescent yellow truck beside it are well-illuminated. Of course, the white car second from the left is also easy to see.

Next is the HID headlight.

Headlight Bulb Type
Our selection of Hot Wheels illuminated by a HID headlight.

The two-tone blue SUV appears much brighter in this image. The red on the far-right car and the yellow on the Lego car beside it are much more subdued than with the halogen light source.

Finally, let’s look at the LED bulb.

Headlight Bulb Type
Our selection of Hot Wheels illuminated by an LED headlight.

Unsurprisingly, the green car stands out more under the LED light. The red, yellow and violet cars remain relatively dark.

Now, let’s combine the three images. I boosted the exposure levels in Adobe Photoshop so the overall brightness is similar in each sample.

Headlight Bulb Type
All three images were adjusted to provide similar exposure.

It’s easy to discern that the ability to see objects depends significantly on the spectral content of light sources and not just their measured lux or rated lumens. A halogen or HID bulb would be best if you wanted the highest-performance lighting system. The worst choice for even light distribution would be an LED bulb. This testing shows that many people underestimate the performance of those old-fashioned halogen bulbs.

Different Lights Illuminate Differently Colored Objects

I was in a vehicle with halogen headlights a few weeks ago while it was dark out. It was clear that those headlights did a much better job illuminating stop and yellow warning street signs than my car with factory-installed HID bulbs. I wouldn’t have described the headlights as bright, but they were surprisingly effective.

If you’re considering a headlight bulb upgrade, remember that the type of bulb you choose will significantly affect what you can see. How bright the bulb is might be less critical. Drop by a specialty mobile enhancement retailer today to find out about the light upgrades that are available for your vehicle.

This article is written and produced by the team at www.BestCarAudio.com. Reproduction or use of any kind is prohibited without the express written permission of 1sixty8 media.

Filed Under: RESOURCE LIBRARY, ARTICLES, Lighting

Headlight Bulb Upgrades: Part 3: Beam Patterns

Beam Pattern

We are back with the third article in our series about headlight bulb upgrades. In the first article, we discussed the many different headlight bulb designs and how they’ve advanced over the last century. The second article in the series explained the terminology used when discussing light sources. How a light assembly projects light onto the road is more important than the choice of the headlight bulb. If it’s aimed in the wrong direction or with emphasis in the wrong area, you won’t be able to see where you are going. Worse, less-than-ideal light distribution may endanger oncoming drivers. In this third article, let’s review headlight beam patterns.

What Is a Headlight Beam Pattern?

Let’s define the term beam pattern. When you shine a light on a surface, it produces a shape. If the light is a point source like a candle, the light is distributed evenly from the source in the form of a sphere. Bringing the candle up close to a surface will result in a round shape that is brightest, where the light source is closest to the surface. The illumination level decreases as the distance between the surface and the light source increases. Out of a headlight assembly, a halogen or HID headlight bulb effectively acts like a point-source light source.

Beam Pattern
The illumination pattern of a candle held near a wall.

The results differ if we have a directional light source, like a flashlight. The beam pattern would be a circle on the wall with a sharp cutoff at the edges. The light emanates from the flashlight in the shape of a cone.

Beam Pattern
The beam pattern created when we point a flashlight at a wall.

Automotive headlamp assemblies are similar to a flashlight. They use a reflector to point the light forward from the front of the vehicle. As forward lighting became brighter, the importance of not blinding oncoming drivers increased. By definition, glare is a harsh, uncomfortably bright light. In the context of our discussion about automotive lighting, glare refers to being subjected to unwanted bright light, typically from another vehicle. An oncoming vehicle’s improperly adjusted lighting system is an excellent example of unwanted glare.

Glare is hazardous as it causes the iris in your eyes to narrow and let in less light. After a vehicle passes you, it takes some time for your iris to open again, making it very difficult to see. Likewise, the bright oncoming light source will drown out darker objects in your peripheral vision. Many advanced driver training courses will suggest that a driver close one eye as a vehicle approaches at night, then open it when the vehicle passes. This process leaves you with one eye ready to see in the dark while the other readjusts. If you’ve seen the movie “Jack Reacher” with Tom Cruise and Robert Duvall, the scene just before the shootout at the mine begins is an example of this technique.

Beam Pattern
If you’ve had to pass a police car at night, their emergency lighting system can be so bright that it’s challenging to see the road.

Modern Automotive Headlight Design

Look at the beam pattern when you drive your car up to a wall or garage door. You’ll quickly realize engineers designed the light to illuminate the road in front of your vehicle without blinding oncoming drivers. What you see will look very different from the flashlight image earlier in this article. Most projector-style headlights have a metal shield between the lens and the reflector that blocks some of the light output. This shield produces a sharp cutoff at the top of the light beam pattern.

Beam Pattern
A close-up of the cutoff shield in a modern projector-style headlight assembly. Image: jlwranglerforums.com user AnnDee444

It’s logical to think that you could use a simple light that’s aimed lower and avoid all the fancy beam-shaping reflectors and shields. The problem with this configuration is that it puts the brightest part of the light, a location called the hot spot, much closer to your vehicle. You don’t want or need much light in the 20 to 60 feet immediately in front of your car or truck. You want most of the light from your headlights focused beyond 300 feet. This configuration will help provide even lighting in front of the vehicle, especially where the cutoff stops illuminating the road.

Beam Pattern
An example of a good headlight beam pattern with a defined cutoff and hot spot.

Driving Beams and High Beams

So far, we’ve only discussed regular low-beam or driving-beam lighting. Switching on your high beams is quite different. The high beams on your vehicle are nearly identical to a flashlight. They project a cone of light that allows you to see much farther down the road. They typically don’t have a cutoff of any kind.

Modern vehicles typically have three different designs for high-beam lighting. Some use secondary light assemblies with dedicated bulbs. Others use a light bulb with two separate filaments. Finally, many projector-style lights have a cutoff that moves out of the way when the high beams are activated. The shield is driven by a small solenoid when the high beams are activated.

Beam Pattern
This BMW has separate light assemblies for regular and high beams.
Beam Pattern
This GMC Sierra pickup truck uses a projector headlight assembly with a moving shutter to switch between low- and high-beam modes.
Beam Pattern
This 9003-style headlight bulb from Sylvania has separate low and high beam filaments.

Analyzing Beam Patterns

We set up a projector assembly from a headlight and loaded three different bulbs into it. We took photos of each bulb to compare the beam patterns and light output. We started with a halogen bulb, switched to HID, and finally to two LED bulbs.

Beam Pattern
The beam pattern picture with an H11 halogen headlight bulb.
Beam Pattern
The beam pattern with a Lumens H11 HID headlight bulb.
Beam Pattern
The beam pattern with a Lumens ATOM LED bulb.
Beam Pattern
The beam pattern with a Lumens Sportline LED bulb.

As a reminder, we’re analyzing beam patterns and not brightness. That said, in our analysis we must consider where the light energy is the brightest.

All images were taken with a Canon 70D camera using an EF-S 10-22mm F/3.5-4.5 USM lens set to its narrowest 22-mm setting. Exposure was 1/80 of a second with an f-stop of 8 and the camera ISO set to 100. No brightness adjustments were made in post-processing, only cropping.

Starting with the halogen bulb, we can see a very bright hot spot in the middle, just to the right of the cutoff. This brightness pattern works well in illuminating objects several hundred feet ahead of the vehicle. The light output to the sides of the hot spot is reasonable. This lateral lighting would help illuminate objects on the sides of the road or as you’re turning a corner. Light output decreases quickly at the bottom of the pattern. This foreground performance helps prevent a bright spot immediately in front of the vehicle.

Moving to the HID bulb, we see a larger diameter hot spot in the middle of the image. This light distribution pattern isn’t as ideal as the halogen bulb. The horizontal performance with the HID is good. You can see some slight unwanted reflections above the cutoff, but they aren’t bad. Finally, the foreground performance looks to be similar to that of the halogen.

Next, we have the ATOM LED bulb in this projector application. This bulb has less of a hot spot, so the light distribution appears relatively even through the illuminated area. One benefit is this LED bulb is that the cutoff is very abrupt. There is little to no light above the cutoff so that oncoming drivers won’t experience as much glare.

Finally, we have the Lumens Sportline bulb. This bulb has a large hot spot in the middle and maintains the sharp cutoff of the ATOM bulb. This bulb puts much more light on the road than the ATOM but is a bit bright in the foreground.

The halogen and HID bulbs significantly outperform the LED bulbs in this application. Keep in mind that this is a specific projector assembly. Further, our research shows that it’s not the highest-quality design available. A differently shaped projector or a reflector-style lighting assembly would likely produce very different results. The takeaway is that your installer needs to experiment with different options to ensure that you get a genuine upgrade for your light bulb investment, not just a different color bulb.

Dangerous Beam Patterns

It’s often difficult to know what to look for in a beam pattern without knowing when something is wrong. Here are some random examples of undesirable headlight beam patterns we found online.

Beam Pattern
Poor light distribution from a BMW 330i. Image: e46fanatics.com user HacksawMark

A quick analysis of the above image shows several issues with the left-side headlight of this BMW 330i. There is a dark spot in the middle of the pattern. The lack of light in the center would dramatically reduce long-distance visibility. There is also too much light at the very bottom of the pattern. Too much light down low illuminates the area immediately in front of the vehicle too much. The result is another reduction in long-distance visibility. The left headlight is also aimed higher than the right. Improper aiming results in blinding oncoming drivers or poor long-distance visibility.

Beam Pattern
An example of a terrible headlight beam pattern. Image: Subaruoutback.org user Wagon_Driver

Based on a quick analysis of the above image, someone has likely installed incorrect bulbs in this Subaru Outback or clocked them incorrectly. There is a poor cutoff, minimal lateral light distribution and far too much light in the foreground. Given the distance to the garage door, we’d also predict that the right-side headlight is aimed much too far to the left. Driving with a lighting system that performs like this could be very dangerous.

Beam Pattern
Improperly aimed headlights. Image: clublexus.com user drmull2

Though the actual light pattern from this 2014 Lexus ES isn’t bad, the headlights need proper aiming. The right headlight is probably aimed too high. The rectangles above the cutoff are intentional and illuminate street signs.

North American and European Lighting Standards

The guidelines for automotive headlights differ significantly between Europe and North America. If you look at the light patterns we’ve shown, there is a clear step in the middle of the pattern. The left side is lower than the right. This pattern provides better road illumination in the front of the vehicle with less chance of blinding an oncoming car or truck. In Europe, rather than a step, the cutoff is at an angle that extends to the edge of the assembly. This pattern illuminates more of the road and increases light to the right-side shoulder. This design would work better to light up road signs.

Beam Pattern
North America and Europe have different automotive headlight cutoff pattern standards.

Proper Forward Lighting Is Crucial to Safe Night Driving

If you’ve changed or upgraded your headlights or are planning to, this article explains the importance of choosing headlight bulbs or light assemblies that work correctly. A high-output bulb in an incorrect application can drastically reduce how well you can see. Work with a specialty mobile enhancement retailer to pick only the best solutions for your application. Improving nighttime visibility may require testing different bulb options in your vehicle. We’ll discuss light color and brightness in our next article.

This article is written and produced by the team at www.BestCarAudio.com. Reproduction or use of any kind is prohibited without the express written permission of 1sixty8 media.

Filed Under: RESOURCE LIBRARY, ARTICLES, Lighting

  • 1
  • 2
  • 3
  • 4
  • Next Page »

Recent Articles

A cartoon USB drive winning a race against cellphones

Android Auto Sound Quality: Is Wired Better Than Wireless?

January 11, 2026 

A while back, we examined the difference in sound quality between wired and wireless Apple CarPlay. Now that many Android-based smartphones have access to additional audio … [Read More...]

A dash camera

What To Look for in a Professional Dash Cam Installation

January 4, 2026 

It wouldn’t be an exaggeration to say that we’ve seen dozens of posts asking about dash cameras that are easy to install and don’t cost much. We’ve all but beaten the topic of dash … [Read More...]

KICKER KEYLOC

Product Spotlight: KICKER KEYLOC

December 29, 2025 

There are a dozen or so high-quality line output converters available to help your installer integrate an amplifier into a factory-installed audio system. That said, most of them … [Read More...]

Two car audio upgrades being done in separate vehicles

The Nitty Gritty on Professional vs. DIY Car Audio Upgrades

December 28, 2025 

Many professionals in the car audio industry started their careers as novices installing equipment for themselves or friends in their driveways and garages. That hands-on … [Read More...]

Audison AV 12 D2 II

Product Spotlight: Audison AV 12 D2 II

December 22, 2025 

Subwoofers with minimal mounting depth requirements continue to grow in popularity. To meet that demand, the team at Audison has introduced a larger, more robust option to … [Read More...]

Customer Reviews

Subscribe to Our Website

Enter your email address to subscribe to our website and receive notifications of new posts by email.

Quakertown Showroom and Installation Facility


Get Directions to Clear Vibrations

Hours

Monday, Tuesday, Wednesday, Thursday, Friday9:00 am – 5:00 pm

Services

  • Car Audio
  • Custom Installation
  • Fleet Services
  • Driver Safety
  • Remote Car Starters

Connect With Us

  • Facebook
  • Instagram
  • Twitter
  • YouTube

Copyright © 2026 Clear Vibrations · Privacy Policy · Website by 1sixty8 media, inc. · Log in


Loading Comments...